Intro
In this part of the series, I am creating the AVD session hosts so my users can start using the new Azure environment. A session host is a virtual machine that users can log in to and use their corporate software while having low latency to other resources placed in Azure.
The steps I will go through in this post are.
- Deploy a virtual machine
- Install the AVD components on the virtual machine. This deployment is a DSC resource that includes the AVD agent
- Join the virtual machine to Azure Active Directory
- FSLogix configurations on the session hosts
- Deployment and verification
Deploy a virtual machine
First, I will deploy a standard Windows virtual machine in Azure. I will use a Windows 11 multi-user operating system for this machine. Microsoft maintains this image, including Office 365 applications like Word, Excel, and Teams.
Before deploying the machine, I need to gather information from my environment. The machine needs to be in a subnet on a virtual network. I am using the data modules to get this information to do the lookups.
I first look up the virtual network, and then the subnet. I can then use the information to create a new network interface that I will attach to the virtual machine.
I also need to look up the password I will use for the local administrator on the virtual machine. This password is in an Azure key vault, so again I will use a data module to look up this information.
With this information, I can use the azurerm_windows_virtual_machine resource to deploy my new virtual machine.
I have added the code below to the sessionhost.tf file under the “rg-avd-cloudninja-001” folder.
data "azurerm_virtual_network" "AVD-vNet" {
  name                = var.avd_vnet
  resource_group_name = var.avd_vnet_resource_group
}

data "azurerm_subnet" "subnets" {
  name                  = var.avd_hostpool_subnet
  virtual_network_name  = data.azurerm_virtual_network.AVD-vNet.name
  resource_group_name   = data.azurerm_virtual_network.AVD-vNet.resource_group_name

}

resource "azurerm_network_interface" "main" {
  count               = var.NumberOfSessionHosts
  name                = "nic-${var.vm_prefix}-${format("%02d",count.index+1)}"
  location            = var.avd_Location
  resource_group_name = azurerm_resource_group.resourcegroup.name

  ip_configuration {
    name                          = "ipconfig"
    subnet_id                     = data.azurerm_subnet.subnets.id
    private_ip_address_allocation = "Dynamic"
  }
}

data "azurerm_key_vault" "kv-cloudninja-avd-002" {
  name                = "kv-cloudninja-avd-002"
  resource_group_name = "rg-keyvault-001"
}

data "azurerm_key_vault_secret" "avd-localadmin" {
  name         = "avd-localadmin"
  key_vault_id = data.azurerm_key_vault.kv-cloudninja-avd-002.id
}

resource "azurerm_windows_virtual_machine" "main" {
  count                 = var.NumberOfSessionHosts
  name                  = "vm-${var.vm_prefix}-${format("%02d",count.index+1)}"
  location            = var.avd_Location
  resource_group_name = azurerm_resource_group.resourcegroup.name
  network_interface_ids = [element(azurerm_network_interface.main.*.id, count.index)]
  size                  = "Standard_D2s_v3"
  license_type          = "Windows_Client"
  admin_username        = "localadmin"
  admin_password        = data.azurerm_key_vault_secret.avd-localadmin.value

  additional_capabilities {
  }
  identity {
    type = "SystemAssigned"
  }
  source_image_reference {
    offer     = "office-365"
    publisher = "microsoftwindowsdesktop"
    sku       = "win11-21h2-avd-m365"
    version   = "latest"
  }
  os_disk {
    name              = "vm-${var.vm_prefix}-${format("%02d",count.index+1)}-osdisk"
    caching              = "ReadWrite"
    storage_account_type = "StandardSSD_LRS"
  }
}
Looking at the code above, you might have noticed that I am using a count setting on the resources I create. Using count ensures that I can deploy any number of virtual machines using the same code. Doing the deployment this way also means I can scale the solution up and down as needed.
To control these settings, I have added the code below to the variables.tf file under the “rg-avd-cloudninja-001” folder.
variable "NumberOfSessionHosts" {
    type = number
    default = 2
}

variable "vm_prefix" {
    type = string
    default = "avd-h1"
}

variable "avd_vnet" {
    type = string
    default = "vnet-avd-001"
}
variable "avd_vnet_resource_group" {
    type = string
    default = "rg-avd-network-001"
}
variable "avd_hostpool_subnet" {
    type = string
    default = "snet-avd-hostpool-001"
}
With the code above, I can now deploy the virtual machine.
Install the AVD components on the virtual machine
Now that I have the virtual machine code completed, I can deploy the AVD components to it. Since I want everything deployed immediately, I include more code in the same deployment file as the virtual machine. The DSC resource deployment uses a virtual machine extension deployment resource.
Below is the code I have added to the sessionhost.tf file under the “rg-avd-cloudninja-001” folder.
resource "azurerm_virtual_machine_extension" "dsc" {
  count = var.NumberOfSessionHosts
  name                 = "AddToAVD"
  virtual_machine_id   = element(azurerm_windows_virtual_machine.main.*.id, count.index)
  publisher            = "Microsoft.Powershell"
  type                 = "DSC"
  type_handler_version = "2.73"
  auto_upgrade_minor_version = true

  settings           = <<SETTINGS
            {
                "modulesUrl": "$var.avd_agent_location",
                "configurationFunction": "Configuration.ps1\\AddSessionHost",
                "properties": {
                    "hostPoolName": "${azurerm_virtual_desktop_host_pool.hostpool.name}",
                    "aadJoin": true,
                    "UseAgentDownloadEndpoint": true,
                    "aadJoinPreview": false,
                    "mdmId": "",
                    "sessionHostConfigurationLastUpdateTime": "",
                    "registrationInfoToken" : "${azurerm_virtual_desktop_host_pool_registration_info.registrationkey.token}"
                }
            }
            SETTINGS

    depends_on = [
        azurerm_windows_virtual_machine.main
    ]
}
As the code above shows, I am deploying DSC resources. I am fetching the resource from a URL site and applying it to the virtual machine. I am also selecting to use Azure AD for the AVD configuration for this virtual machine. I do need to have the registration token for the AVD host pool. This registration token is from the host pool we did earlier in this blog series.
Microsoft hosts the URL used for the DSC resource, and I have added the URL to my variables.tf file as shown below.
variable "avd_agent_location" {
    type = string
    default = "https://wvdportalstorageblob.blob.core.windows.net/galleryartifacts/Configuration_06-15-2022.zip"
}
Join the virtual machine to Azure Active Directory
The last piece to the AVD session host puzzle is to join the virtual machine to Azure Active Directory. Azure AD join is a straightforward process. I only have to deploy another virtual machine extension to my VM. This extension is called AADLoginForWindows and will ensure the join to Azure AD.
Below is the code I have added to the sessionhost.tf file under the “rg-avd-cloudninja-001” folder.
resource "azurerm_virtual_machine_extension" "AADLoginForWindows" {
    count = var.NumberOfSessionHosts
    name                              = "AADLoginForWindows"
    virtual_machine_id   = element(azurerm_windows_virtual_machine.main.*.id, count.index)
    publisher                         = "Microsoft.Azure.ActiveDirectory"
    type                              = "AADLoginForWindows"
    type_handler_version              = "1.0"
    auto_upgrade_minor_version        = true
    depends_on = [
        azurerm_virtual_machine_extension.dsc
    ]
}
FSLogix configurations on the session hosts
For the FSLogix profiles to work, I need to create two registry settings on the virtual machine. Now it would be great if I could use Intune to make this work, but since I want my machines to be ready as fast as possible, this solution won’t be good enough for me.
The way I solved it was to run a set of PowerShell commands on the virtual machine using the Azure CLI. Running the command is straightforward, but remember that is an escape character, so two are needed to write one.
Below is the code I have added to the sessionhost.tf file under the “rg-avd-cloudninja-001” folder.
resource "null_resource" "FSLogix" {
  count = var.NumberOfSessionHosts
  provisioner "local-exec" {
    command = "az vm run-command invoke --command-id RunPowerShellScript --name ${element(azurerm_windows_virtual_machine.main.*.name, count.index)} -g ${azurerm_resource_group.resourcegroup.name} --scripts 'New-ItemProperty -Path HKLM:\\SOFTWARE\\FSLogix\\Profiles -Name VHDLocations -Value \\\\cloudninjafsl11072022.file.core.windows.net\\avdprofiles -PropertyType MultiString;New-ItemProperty -Path HKLM:\\SOFTWARE\\FSLogix\\Profiles -Name Enabled -Value 1 -PropertyType DWORD;New-ItemProperty -Path HKLM:\\SYSTEM\\CurrentControlSet\\Control\\Lsa\\Kerberos\\Parameters -Name CloudKerberosTicketRetrievalEnabled -Value 1 -PropertyType DWORD;New-Item -Path HKLM:\\Software\\Policies\\Microsoft\\ -Name AzureADAccount;New-ItemProperty -Path HKLM:\\Software\\Policies\\Microsoft\\AzureADAccount  -Name LoadCredKeyFromProfile -Value 1 -PropertyType DWORD;Restart-Computer'"
    interpreter = ["PowerShell", "-Command"]
  }
  depends_on = [
       azurerm_virtual_machine_extension.AADLoginForWindows
    ]
}
The code above uses a “null_resource.” Using the local-exec provider means the code runs on the machine executing the Terraform deployment. The resource performs the following actions in PowerShell on the AVD session host.
New-ItemProperty -Path HKLM:\SOFTWARE\FSLogix\Profiles -Name VHDLocations -Value \\cloudninjafsl11072022.file.core.windows.net\avdprofiles -PropertyType MultiString
New-ItemProperty -Path HKLM:\SOFTWARE\FSLogix\Profiles -Name Enabled -Value 1 -PropertyType DWORD
New-ItemProperty -Path HKLM:\SYSTEM\\CurrentControlSet\Control\Lsa\Kerberos\Parameters -Name CloudKerberosTicketRetrievalEnabled -Value 1 -PropertyType DWORD
New-Item -Path HKLM\Software\Policies\Microsoft\ -Name AzureADAccount
New-ItemProperty -Path HKLM:\Software\Policies\Microsoft\AzureADAccount  -Name LoadCredKeyFromProfile -Value 1 -PropertyType DWORD
Deployment and verification
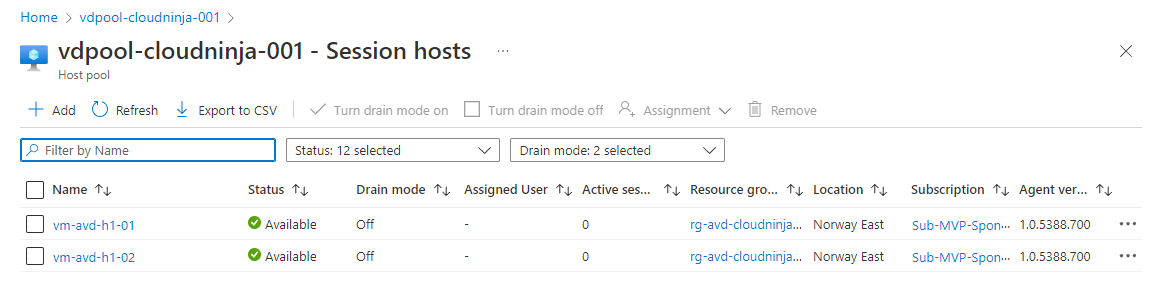
With the above changes to my code, I can commit the changes to GitHub, and it will automatically kick off the GitHub Action that will deploy the session hosts to my environment. I can verify this in the Azure portal by going into the AVD Host pool and clicking on session hosts.
Below you can see what it looks like in my environment.
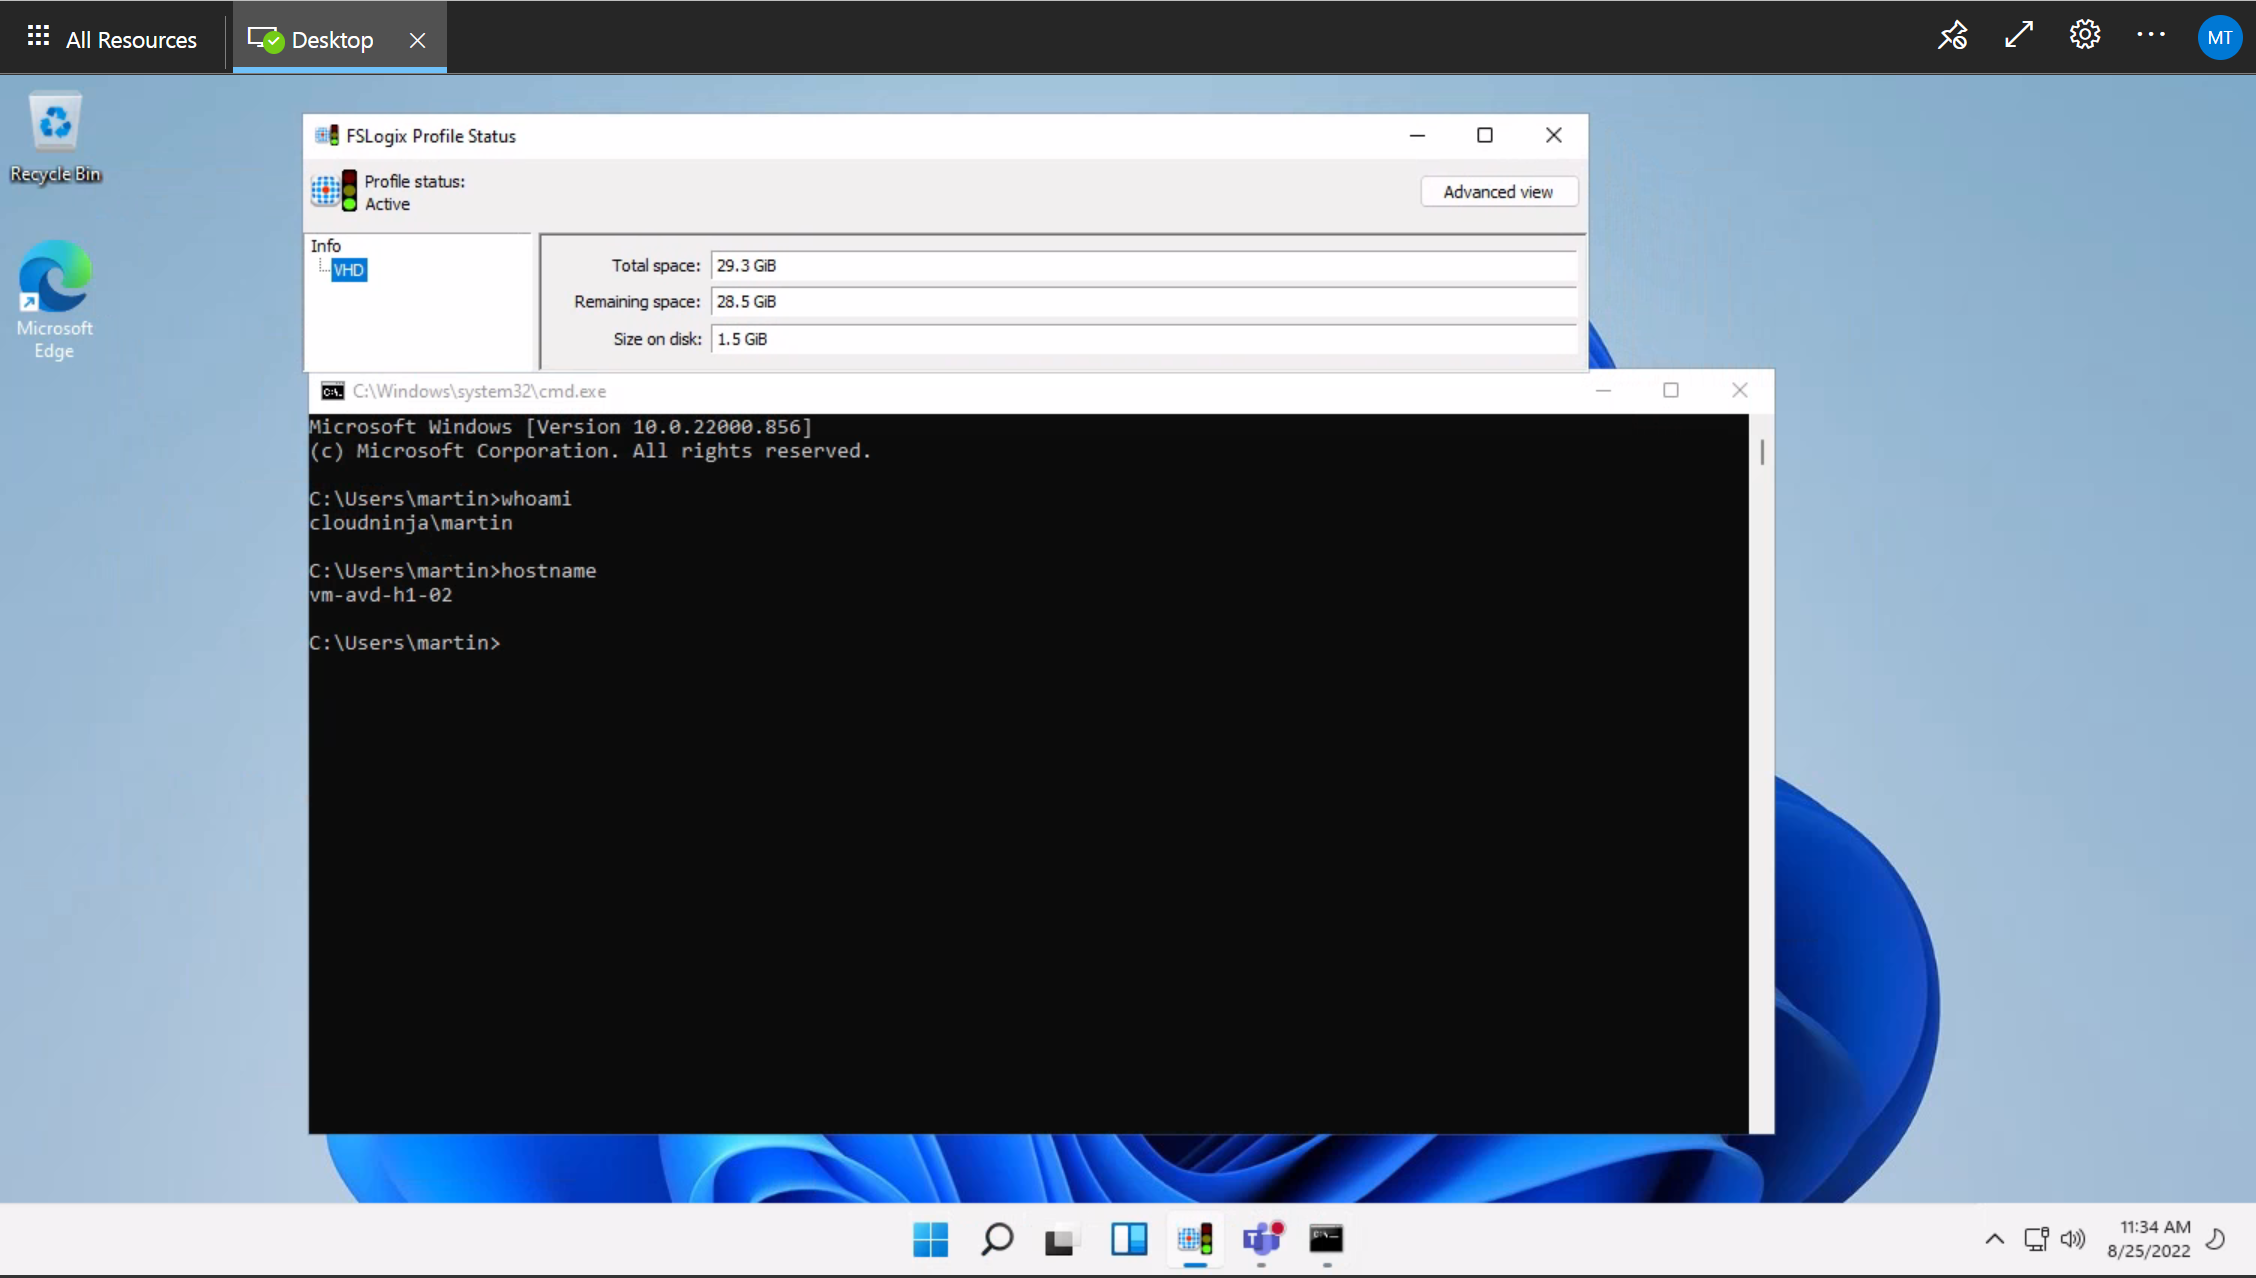
I can also log into the AVD using the web client (or the native client if installed) to verify that everything is working as expected. On the screenshot below, we can see the hostname of the AVD session host, my username, and FSLogix has successfully mounted my profile with all green lights.
Summary
I have successfully deployed my AVD environment and showed that I could log in to my new environment. There have been quite a few posts in this series, but I hope the content is helpful for you. I will probably pick this series up again in the near future, but this post concludes the steps I had planned out so far. Feel free to contact me if you have any ideas about additions or something you would like me to blog about.
Any feedback is welcome, so reach out on Twitter or LinkedIn, so I can fix any errors or optimize the code I am using.
Links to other parts of the blog series
Part 1: https://www.cloudninja.nu/post/2022/06/github-terraform-azure-part1/
Part 2: https://www.cloudninja.nu/post/2022/06/github-terraform-azure-part2/
Part 3: https://www.cloudninja.nu/post/2022/06/github-terraform-azure-part3/
Part 4: https://www.cloudninja.nu/post/2022/06/github-terraform-azure-part4/
Part 5: https://www.cloudninja.nu/post/2022/07/github-terraform-azure-part5/
Part 6: https://www.cloudninja.nu/post/2022/07/github-terraform-azure-part6/
Part 7: https://www.cloudninja.nu/post/2022/08/github-terraform-azure-part7/
Link for all the code in this post
I have put all the code used in this blog post on my GitHub repository, so you can download or fork the repository if you want to.